I love Ubuntu, especially as a development environment. Since the release of 14.04, I decided to try it out on my 13" Macbook Pro Retina.
1. Partition
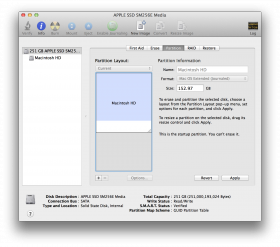
The first step is pretty simple. You can resize the Macintosh partition using the OSX Disk Utility. I resized the OSX partition to 152GB and left the rest as free space.
2. Create USB Installer
You should follow the directions http://www.ubuntu.com/download/desktop/create-a-usb-stick-on-mac-osx to create a 64-bit Ubuntu USB startup drive. At the end of the instructions, you'll see an error message indicating that OSX isn't able to read the drive.
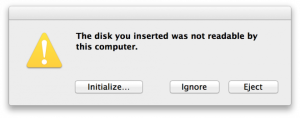
Don't worry, this is normal and it should still work as a USB installer but you just won't be able to read/write to the drive itself. (OPTIONAL but RECOMMENDED) Since you won't be able to read/write to this drive, if you have another USB stick handy, you should copy the wifi drivers to the 2nd USB stick. http://packages.ubuntu.com/trusty/amd64/bcmwl-kernel-source/download http://packages.ubuntu.com/trusty/all/dkms/download After the Ubuntu installation, wifi will not work and you will need to install the driver and one of its dependencies to get it working. The other 2 dependencies should already be included as part of the installation.
3. Install Boot Manager
I used rEFInd as the boot manager instead of rEFIt. It seems to work for me. You can find it here: http://www.rodsbooks.com/refind/getting.html and download the binary zip file. Once downloaded and unzipped, open a Terminal window and install:
cd ~/Downloads/refind-bin-0.6.7
 ./install.sh
4. Install Ubuntu
Here comes the fun part. Insert your Ubuntu USB installer and restart your computer. When the computer restarts, you should see your new boot manager screen with an Apple and a triangle shaped icon for the Ubuntu installer. Right arrow over to the installer and hit Enter to select it. This will load the typical Ubuntu installer. Select "Install Ubuntu". If this is the first time you are installing Ubuntu, it should give you the option to install Ubuntu alongside Mac OSX. If you are reinstalling over a bad installation, it will give you the option to erase Ubuntu only and reinstall. WARNING! If you are attempting a reinstall and select this option, the previous swap partition will not be reused or erased. A new one will be created meaning you will lose about 8GBs of space for nothing. Instead of having the installer create the partitions for you, initial install or reinstall, I recommend selecting the "Something else" option and create your own partitions. If you select "Something else" you will see a screen with a list of partitions. If this is a reinstall, scroll to the bottom of the list and delete the previous install's paritions. At the very bottom of the list is "Free space". Select that and click on the "+" sign to create a new partition. You can create a root "/" using ext4 with a size of about 25GB. Next, create a swap partition with a size around 8 to 16GB. Finally, create an ext4 home "/home" partition with the rest of the remaining space and continue with the installation. After the installation, it will ask you to reboot and you should do so. If you get a blank screen after the message, just hit the space bar and it will continue.
5. Setting Up WIFI
After you restart, you should see a Ubuntu logo, an Apple logo and the Linux penguin. You may also see the diamond shaped logo if your USB stick is still plugged in. If you didn't have a 2nd USB stick, you will need to get the wifi drivers. Select the Apple logo to boot into Mac OS, format the USB installer so it can be read and copy the drivers from the links above onto the USB stick. Reboot. When you have your wifi drivers, select the penguin logo. You should see the normal GRUB menu on the left hand side. Go ahead and select the first option, "Ubuntu" and continue to log in and admire your beautiful Ubuntu installation. You can change the resolution by clicking on the Dash and selecting "Displays" to make things easier to read. Insert your USB stick with your wifi drivers if you haven't already done so and open a Terminal. Change to the directory of the USB stick and install each of the 3 dependencies first and then the wifi driver last.
cd /media/[USERNAME]/[USB DRIVE]
sudo dpkg -i  dkms*.deb
sudo dpkg -i bcmwl*.deb
You should now have wifi access. Woohoo! From here on out, everything should be working. I haven't encountered any problems and I found 14.04 to be very fast and smooth.
Comments
comments powered by Disqus